Python API: Difference between revisions
| Line 79: | Line 79: | ||
: Send us Your program, contents of the "logs" directory, the return code, error message and what do You want to do with the detector device. | : Send us Your program, contents of the "logs" directory, the return code, error message and what do You want to do with the detector device. | ||
'''If a problem like as "DLL load failed'''" occured and you want contact technical support | '''If a problem like as "DLL load failed'''" occured and you want contact technical support | ||
: Use the dir command and send us Your program, the error message, version of | : Use the dir command and send us Your program, the error message, version of Python that is installed on the computer and the dir output. | ||
: '''Tip:''' Use DIR with subdirs, redirected to file and python version redirected to file, than send us the files: | : '''Tip:''' Use DIR with subdirs, redirected to file and python version redirected to file, than send us the files: | ||
: <syntaxhighlight> | : <syntaxhighlight> | ||
Revision as of 14:38, 31 October 2023
Overview
The python API can be used:
- directly in the system console, using a general python interpret
- in the Pixet program integrated python console
The base is pypixet object. It has methods for initialize and deinitialize, can create the pixet object.
The pixet object have device list, can create device objects and allows access to global properties.
A device objects have methods for acquisions and allows access to device parameters.
The pypxproc object is intended for use to processing of a data.
The pygui object allows you to create your own graphical interface. It can be used only if a script is run from the Pixet program.
Small code example for using in the system console or other third-party environment, with the Python 3.9:
import pypixet

print("pixet core init...")
pypixet.start()
pixet=pypixet.pixet
devices = pixet.devicesByType(pixet.PX_DEVTYPE_TPX3)
dev = devices[0]
dev.setOperationMode(pixet.PX_TPX3_OPM_EVENT_ITOT)

print("dev.doSimpleAcquisition (3 frames @ 1 sec) - start")
rc = dev.doSimpleAcquisition(3, 1, pixet.PX_FTYPE_AUTODETECT, "example.png")
print("dev.doSimpleAcquisition - end:", rc, "(0 is OK)")

pixet.exitPixet()  # save settings, correct stop devices and core exit
pypixet.exit()     # both lines important if third-party debug environment used
Small code example for using in the Pixet python console with integrated Python:
# do not create the pypixet and pixet, they exist by default

devices = pixet.devicesByType(pixet.PX_DEVTYPE_TPX3)
dev = devices[0]
dev.setOperationMode(pixet.PX_TPX3_OPM_EVENT_ITOT)

print("dev.doSimpleAcquisition (3 frames @ 1 sec) - start")
rc = dev.doSimpleAcquisition(3, 1, pixet.PX_FTYPE_AUTODETECT, "example.png")
print("dev.doSimpleAcquisition - end: %i (0 is OK)" % rc)

# do not execute the pixet.exitPixet(), it will cause whole the Pixet program to exit
Requirements
The Pixet Python API can be used from the Python interpreter integrated in the Pixet program or from commandline with external Python without the Pixet.
For starting from the Pixet Python scripting plugin are not need any special files.
If you want to run scripts without the Pixet, need additional files:
API functions using of pypixet.pyd and pypxproc.pyd and need Python versions 2.7 to 3.9, for Windows the Pixet core dlls: pxcore.dll, pxproc.dll, or linux .so ekvivalents.
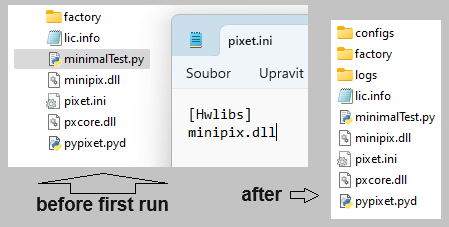
The Pixet core need the pixet.ini file with proper hwlibs list inside, necessary hardware dll files (eq minipix.dll), subdirectory “configs” with config files for all present imaging chips (eq MiniPIX-I08-W0060.xml).
Pixet core on Windows need more Microsoft Visual Studio .NET standard dlls (vccorlib140.dll etc).
Project and auxilliary files examples
| This is the directory and the pixet.ini file of the minimalistic python project. Using only with the Minipix device and can be run on computer with properly installed MS Visual Studio or it's auxiliary files installed by other way. The "factory" directory contains the factory config file.
|
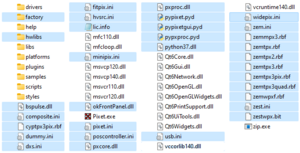
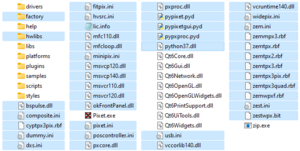
If the MS VS auxilliary files are not accesible from the project directory, you can copy it from the Pixet program directory. In this image you can see all the auxiliary files marked, including MS VS dlls, firmware files for all our devices, hwlibs directories, ... Copying it to a python project should always make it ready to work, but not all are always needed.
Pixet files details
see:
- Small: Pixet SDK: Auxilliary files
- Details: Main directory of the API-using programs, independent on the Pixet
Basic troubleshooting
If normal error occured, like as function returns negative return code:
- Use the device.lastError() to get error message and print or log it.
If You want contact technical support
- Send us Your program, contents of the "logs" directory, the return code, error message and what do You want to do with the detector device.
If a problem like as "DLL load failed" occured and you want contact technical support
- Use the dir command and send us Your program, the error message, version of Python that is installed on the computer and the dir output.
- Tip: Use DIR with subdirs, redirected to file and python version redirected to file, than send us the files:
dir /s > dir.txt
python -c "import sys; print(sys.version_info)" > pyVersion.txt
Documentation
The documentation of the Python API is in a PDF file located in the API package.


